Autogui: an automatic GUI binding library
| English | 日本語 |
Autogui is a library for automatically creating Java/Swing GUI apps from plain-old Java objects. It analyzes class-definitions of given objects through reflection APIs, and composes Swing-based components for each type of property and action defined in the classes.
License
Building from source
git clone https://github.com/ppp-kohe/autogui.git
cd autogui
The project uses apache-maven and depends on a recent version of Java.
- 1.7- : Java 21 or later
- 1.2- : Java 11 or later
- -1.1.x : Java 8 or later
mvn package
  # the command will generate target/autogui-1.8.jar

mvn install
  # the command makes the built library available locally to other projects.
Note that the main part of the project does not depend on any libraries other than JDK classes.
So you can manually compile source files placed in src/main/java (also src/main/resources for resources).
Maven usage
To use the library in your apache-maven project, you can insert the following dependency section into pom.xml.
    <dependency>
        <groupId>org.autogui</groupId>
        <artifactId>autogui</artifactId>
        <version>1.8</version>
    </dependency>
The library jar is available from Maven Central Repository: org.autogui:autogui.
![]()
API documents
Quick tutorial: A tiny example with jshell
The library can be used with jshell that is the official REPL-tool bundled with JDK since Java 9.
To use the library, you first need to include the jar file of the library to your class-path.
In jshell, you can do that by /env -class-path <path/to/jar>.
Simple steps for using the library with jshell is like following.
- In the terminal, as described in Building from source, move to the directory
autoguiand build the library. (supposing the environment JDK, Git and Maven are installed) - start
jshell - type
/env -class-path target/autogui-1.8.jarin order to enable accessing the library. - next, type the following lines of code: it defines the class
Hello.class Hello { String value; void action() { System.out.println(value); } } - also, type the following 3 lines of code: it uses the library and a window will be displayed.
import org.autogui.swing.*; Hello h = new Hello(); AutoGuiShell.showLive(h);
After following the steps above, the terminal should look something like this:
$ git clone https://github.com/ppp-kohe/autogui.git
$ cd autogui
$ mvn package
$ jshell
| Welcome to JShell -- Version 21.0.3
| For an introduction type: /help intro
jshell>
class Hello {
    String value;
    void action() {
        System.out.println(value);
    }
}
/env -class-path target/autogui-1.8.jar
import org.autogui.swing.*;
Hello h = new Hello();
AutoGuiShell.showLive(h);
The above code defines the class Hello with an instance field and a method.
After that, org.autogui.swing.AutoGuiShell.showLive(Object) starts creating a GUI window from the given object and shows the window.
The created window will contain a text field labeled as “Value” and a button on the tool-bar labeled as “Action”.
You can fill the text field with the string “hello, world” by typing the keyboard and click the button, then you will see “hello, world” on the console of jshell.

This means that the library creates the text field from the field value. The type of the field String specifies the type of the component as a text field.
If you edit the text of the text field on the created window, the library automatically sets the value of the field of the given object h to the text input in the text field. This can be confirmed by jshell> h.value.
Also, the method action is bound to the action of the button on the tool-bar. If you click the button, the method will be invoked with the given object.
Example applications
See src/test/java/autogui/demo.
You can execute the code in the directory, by mvn test-compile exec:java -Dexec.classpathScope=test -Dexec.mainClass=....
ImageFlipDemo
For example:
mvn test-compile exec:java -Dexec.classpathScope=test -Dexec.mainClass=org.autogui.demo.ImageFlipDemo
ImageFlipDemo.java is a bit interesting and useful example:
package org.autogui.demo;

import org.autogui.swing.AutoGuiShell;
import javax.imageio.ImageIO;
import java.awt.image.BufferedImage;
import java.io.File;

public class ImageFlipDemo {
    public static void main(String[] args) {
        AutoGuiShell.showLive(new ImageFlipDemo());
    }
    BufferedImage image;
    File output = new File("output.png");

    void flipY() {
        int w = image.getWidth();
        int h = image.getHeight();
        BufferedImage newImage = new BufferedImage(w, h, image.getType());
        for (int y = 0; y < h; ++y) {
            for (int x = 0; x < w; ++x) {
                newImage.setRGB(x, h - y - 1, image.getRGB(x, y));
            }
        }
        image = newImage;
    }

    void save() throws Exception {
        if (output.exists()) {
            System.err.println("File already exists: " + output);
        } else {
            ImageIO.write(image, "png", output);
        }
    }
}
The program will show a GUI window like the following image:
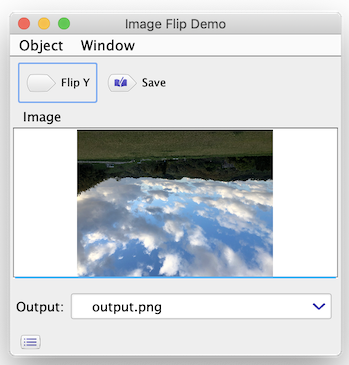
The displayed window has the following GUI components:
-
The image pane Image created from the field
BufferedImage image: You can drag & drop an image file to supply an input image data. The dropped image will be automatically loaded as aBufferedImageobject and displayed in the pane and assigned to the field. - The action button Flip Y created from the method
void flipY(): After dropping an image, you can click the button to flip Y coordinate of the image. The creatednewImagewill be assigned to theimagefield. After the execution of the method, the image pane will show the flipped image. - The file name field Output created from the field
File output: You can put the name of saving the flipped image. The field initially displays “output.png” in the working directory as the initial value of the field. User input for the text field will change the field value to a newFileobject. - The action button Save created from
void save(): The action can write the flipped image as a new file specified by the Output field.
FileRenameDemo
Here is another example for demonstrating table feature of the library.
mvn test-compile exec:java -Dexec.classpathScope=test -Dexec.mainClass=org.autogui.demo.FileRenameDemo
The command will show a GUI window like the following image:
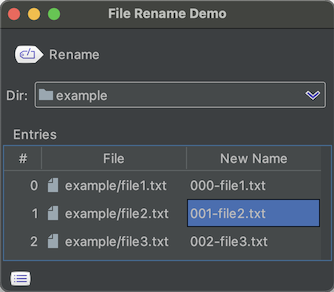
You can drag & drop a directory to the Dir field and then listing files in the directory as the Entries table. Note the Rename button actually changes names of the listed files to New Names without any warning.
This is constructed from the following code:
package org.autogui.demo;

import org.autogui.GuiIncluded;
import org.autogui.swing.AutoGuiShell;

import java.io.File;
import java.util.*;

@GuiIncluded public class FileRenameDemo {
    public static void main(String[] args) {
        AutoGuiShell.get().showWindow(new FileRenameDemo());
    }

    File dir;

    @GuiIncluded public File getDir() { return dir; }
    @GuiIncluded public void setDir(File dir) {
        boolean update =
             dir != null && !Objects.equals(this.dir, dir);
        this.dir = dir;
        if (update && dir.isDirectory()) {
            List<RenameEntry> es = new ArrayList<>();
            int i = 0;
            List<File> files = new ArrayList<>(
                            Arrays.asList(dir.listFiles()));
            files.sort(Comparator.naturalOrder());
            for (File file : files) {
                es.add(new RenameEntry(file,
                  String.format("%03d-%s",
                                i, file.getName())));
                ++i;
            }
            entries = es;
        }
    }

    List<RenameEntry> entries = new ArrayList<>();

    @GuiIncluded public List<RenameEntry> getEntries() {
        return entries;
    }

    @GuiIncluded public static class RenameEntry {
        File file;
        String newName;
        public RenameEntry(File file, String newName) {
            this.file = file;
            this.newName = newName;
        }
        @GuiIncluded public File getFile() {
            return file;
        }
        @GuiIncluded public String getNewName() {
            return newName;
        }
        @GuiIncluded public void setNewName(String newName) {
            this.newName = newName;
        }
    }

    @GuiIncluded public void rename() {
        for (RenameEntry e : entries) {
            File newFile = new File(
                e.getFile().getParentFile(), e.getNewName());
            if (e.getFile().exists() && !newFile.exists()) {
                e.getFile().renameTo(newFile);
            }
        }
    }
}
- In this demo, the library constructs GUI components by selecting only members attached the annotation
@GuiIncluded. This is launched byAutoGuiShell.get().showWindow(...)as I call strict mode. - The file-path field Dir: When the user edits the field, the new text is set as
Fileby invokingsetDir(File). The method loads files in the directory and constructs a newArrayListobject ofRenameEntry.RenameEntryis the static nested class, and containsFileand a new name prefixed with an index (byString.format("%03d-%s",...)). The rewritingentries = es;will cause updating the table display. - The Entries table: constructed from the list returned by
getEntries(). The table columns are defined by the properties File and New Name of the element type of the list<RenameEntry>. Each row of the table corresponds to each element of the list. The updating of the item size in the table will be caused by changing of the identity of the list object returned by the getter method. - The Rename button: created from the
rename()method for renaming entries.
The table component of collection objects in the library is so powerful to extend the usage of applications.
Strict mode with @GuiIncluded
To create an application that can be executed from the main method,
it is reasonable to restrict GUI-aware members in the specified object.
@GuiIncluded and
AutGuiShell.get().showWindow(o) satisfy the restriction.
The strict mode …
- can be started by
AutoGuiShell.get().showWindow(o) - targets on
@GuiIncludedandpublicclasses, properties and members
The following Java program is an example application with the strict mode:
  import org.autogui.GuiIncluded;
  import org.autogui.swing.AutoGuiShell;

  @GuiIncluded
  public class Hello {
      public static void main(String[] args) {
          AutoGuiShell.get().showWindow(new Hello());
      }

      @GuiIncluded
      public String hello;

      @GuiIncluded
      public void action() {
          System.out.println(hello);
      }

      @GuiIncluded
      public NonIncludedType label = new NonIncludedType();
         //this property will be a label with the text from toString()

      static class NonIncludedType {
          public String toString() { return "non-included"; }
      }
  }
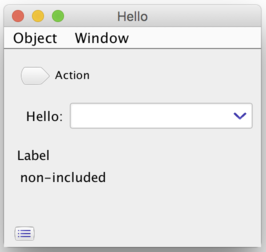
The showWindow instance method of AutGuiShell restricts members to
public ones with the annotation org.autogui.GuiIncluded attached.
With AutoGuiShell.get().showWindow(o), you will need to attach the annotation to all members (classes, fields, getters, setters and actions) you want to include GUI.
Using from modules
If your code for binding with the library is defined as a member of a module which is introduced since Java 9, you will need to open your code to the library. This is because the library relies on reflection APIs for accessing your code. In a named module, the reflection APIs are restricted to open members.
The module name of the library is org.autogui. You will need to do the following steps in your module-info.java :
- add the
openmodifier to your module declaration, orexports(oropens) your packages ` to org.autogui;` requires org.autogui;
//your module-info.java
open module your.module { //adds the "open" modifier to the your module, or...
    exports your.pack to org.autogui; //exports your package to the library.
                                  //you can also use "opens your.pack to autogui;"

    requires org.autogui;   //allows your code to access the library.
    //Note that org.autogui depends on JDK's java.desktop, java.datatransfer and java.prefs
}
The earlier versions (-1.1) of the library was an automatic module, which does not contain module-info.class because of supporting Java 8. You can add the jar of the library to both the class-path and the module-path. But, an automatic module cannot be included in jlink’s modules.
The recent versions (1.2-) have the module-info.class and require Java 11 or later. It can still be added to both the class-path and the module-path, and can also be assembled as a custom runtime image generated by jlink. (But the library still relies on reflection APIs, so you should carefully consider when adopting it in your practical products.)
Supported types and components
- Basic value types
- String text-field:
java.lang.String - File text-field:
java.nio.file.Pathorjava.io.File - Number spinner: a primitive numeric(
byte,short,int,long,floatordouble) or a sub-type ofjava.lang.Number - Boolean check-box:
booleanorjava.lang.Boolean - Enum pull-down menu: a sub-type of
java.lang.Enum(anenumtype) - Image pane: a sub-type of
java.awt.Image - Document editor:
java.lang.StringBuilderorjavax.swing.text.Document - Embedded component: a sub-type of
javax.swing.JComponent
- String text-field:
- Object pane: a user-defined object type with composition of properties and actions
- Object properties:
T getP() {...},T p() {...}(1.2-) ,void setP(T) {...}orT p;- if all members are other user-defined objects, then the enclosing object will be bound to a tabbed-pane
- Action methods:
void m() {...}
- Object properties:
- Collection table: a sub-type of
java.util.Collection<E>or an arrayE[]with columns basedE- Value columns for
E- String column:
java.lang.String - File column:
java.nio.file.Pathorjava.io.File - Number column: a primitive numeric or a sub-type of
java.lang.Number - Boolean column:
booleanorjava.lang.Boolean - Enum column: a sub-type of
java.lang.Enum - Image column: a sub-type of
java.awt.Image - Embedded component: a sub-type of
javax.swing.JComponent
- String column:
- Object rows: A user-defined object-type composing columns from its properties and actions
- Dynamic Collection table: a nested
Collection<Collection<E>>or a multi-dimensional arrayE[][]
- Value columns for
String text-field
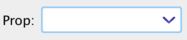
A property of
java.lang.String
will be bound to a text field.
  class Hello {
      String prop;
  }
  org.autogui.swing.AutoGuiShell.showLive(new Hello())
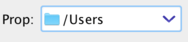
File text-field
A property of
java.nio.file.Path or
java.io.File
will be bound to a text field with an extension for file operations.
  import java.io.File;
  class Hello {
      File prop;
  }
  org.autogui.swing.AutoGuiShell.showLive(new Hello())
Number spinner
A property of a numerical type will be bound to a number spinner.
Numerical types includes primitive types (byte, short, int, long, float and double) and sub-types of
java.lang.Number including
java.math.BigInteger and java.math.BigDecimal
  class Hello {
      int prop;
  }
  org.autogui.swing.AutoGuiShell.showLive(new Hello())

Boolean check-box
A property of boolean or
java.lang.Boolean
will be bound to a check-box.
  class Hello {
      boolean prop;
  }
  org.autogui.swing.AutoGuiShell.showLive(new Hello())

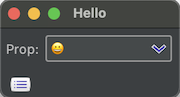
Enum pull-down menu
A property of an enum type (a sub-type of
java.lang.Enum
) will be bound to a pull-down menu (non editable combo-box).
Members of the enum becomes items of the menu.
  enum HelloEnum {
      Hello, World
  }
  class Hello {
      HelloEnum prop = HelloEnum.Hello;
  }
  org.autogui.swing.AutoGuiShell.showLive(new Hello())

Image pane
A property of
java.awt.Image
or its sub-type will be bound to a pane for image previewing.
  import java.awt.*;
  class Hello {
      Image prop;
  }
  org.autogui.swing.AutoGuiShell.showLive(new Hello())
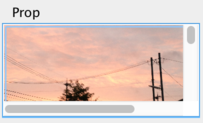
The pane supports drag & drop and zooming by the mouse wheel with the Alt(option) key.
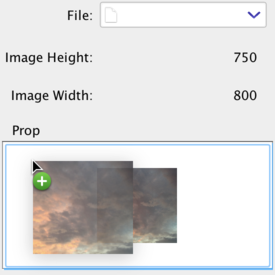
For handling images in code,
java.awt.image.BufferedImage and
javax.imageio.ImageIO
are useful.
  import java.io.File;
  import java.awt.image.*;
  import javax.imageio.*;
  class Hello {
      private File file;
      void setFile(File f) throws Exception {
          file = f;
          if (f != null && f.isFile()) prop = ImageIO.read(f);
      }
      File getFile() { return file; }
      BufferedImage prop;
      int getImageWidth() {
          return prop == null ? 0 : prop.getWidth();
      }
      int getImageHeight() {
          return prop == null ? 0 : prop.getHeight();
      }
  }
  org.autogui.swing.AutoGuiShell.showLive(new Hello())
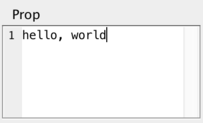
Document editor
A property of
java.lang.StringBuilder
or
javax.swing.text.Document
and its sub-type will be bound to a text-edit pane.
  class Hello {
      StringBuilder prop = new StringBuilder();
  }
  org.autogui.swing.AutoGuiShell.showLive(new Hello())
A change of the property value (changing the identity of the document object) will cause replacing the document of the editor. So the property needs to hold/return a consistent value for maintaining the editing contents by the user.
Advice about document properties
The text-edit pane will reflect modifications of text contents to the bound property value.
For StringBuilder, it automatically creates a Document wrapping the builder object.
The current algorithm for modifications of the document is naive.
So it might not be suitable for editing large sized texts.
Note that the documents and text-edit components in Swing seem to have designed as that any changes to the document must be happen within the text-edit component.
So, the user code should not modify contents of StringBuilder or Document of the property value.
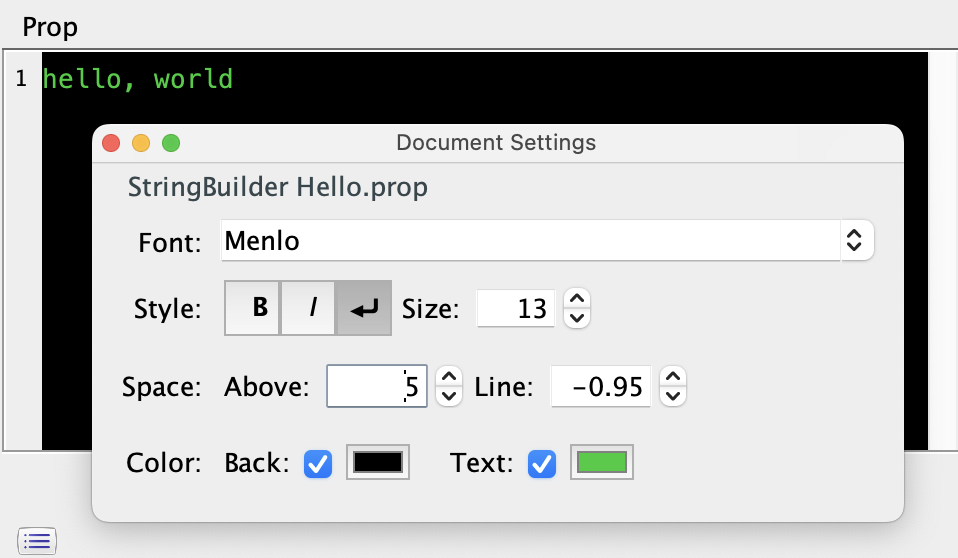
When the type of the property is
javax.swing.text.StyledDocument
, its sub-type or StringBuilder,
the user can change its (global) style by settings from the context menu.
Object pane
A property of a user-defined object class will be bound to a pane composing members of the class.
  class Hello {
      String prop1;
      int prop2;
      E prop3 = new E();
      void action() {
          System.out.printf("Hello: %s %d %s\n", prop1, prop2, prop3);
      }
  }
  class E {
      String prop;
      void actionE() {
          System.out.printf("E: %s\n", prop);
      }
  }
  org.autogui.swing.AutoGuiShell.showLive(new Hello())
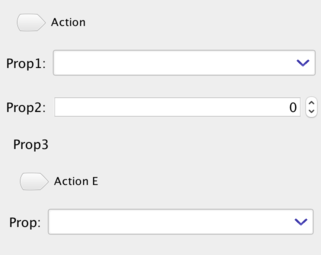
An object class can contains properties of some other object classes which will be bound to sub-panes for the objects.
Action method
The members of the object class can include action-methods bound to tool-bar buttons.
Names of those methods does not start with get, is or set and does not take any arguments.
Such action-method can read and write properties of the object. If the action-method changed a property of the object, after the execution fo the method the UI automatically specifies changed property and updates the bound UI component.
There are cases of buttons has specific icons determined from their method names.
Those icons are chosen from a predefined set in the library and determined by a word in the name.
For instance, the library has a “+” mark icon for the word add, and the button of the action method addItem() will has the icon.
Also, a word has predefined synonyms; for example, insert and append will have same icon for add.
The predefined set of icons and associated words can be viewed by running src/test/java/org/autogui/demo/IconListDemo.java.
mvn test-compile exec:java -Dexec.classpathScope=test -Dexec.mainClass=org.autogui.demo.IconListDemo
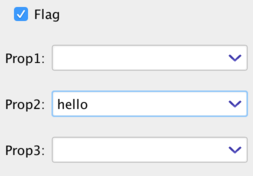
Property definition
A user-defined object class has properties which are bound as sub-components. A property can be defined as 1) an accessible field definition or 2) a pair of getter and setter methods.
  class Hello {
      String prop1;

      private String prop2 = "hello";
      String getProp2() { return prop2; } //read-only

      private String prop3;
      String getProp3() { return prop3; }
      void setProp3(String p) {
          prop3 = p;
          System.err.println("updated " + prop3);
      }

      private boolean flag = true;
      boolean isFlag() { return flag; } //is...() for boolean
      void setFlag(boolean b) { flag = b; }
  }
  org.autogui.swing.AutoGuiShell.showLive(new Hello())
A getter method is a method whose name starts with get or is for booleans and which does not take any arguments with returning a value of the type of the property.
Since 1.2, the library also supports the T prop() method as a getter like String prop(). This is due to supporting record constructs introduced since Java 14. This rule may unintentionally hide your action method that returns a non-void value and recognize it as a getter. To back the recognition as an action method, you can use the annotation parameter @GuiIncluded(action=true).
A setter method is a method whose name starts with set and which takes only one argument of the type of the property value.
If a property is defined only a getter method, then the property value becomes read-only.
In the setter method, the user code can cause modification of some other properties. The created UI automatically specifies changed properties of the object pane. In order to achieve the UI updating, a getter method will be called abruptly and frequently.
AutoCloseable support
If a user-defined object class implements
java.lang.AutoCloseable,
then
close()
of objects of the class will be called at closing of owner window of those objects.
(A returned window by AutoGuiShell.showLive(o) does not automatically call the method by window closing. Use
cleanUp()
for completely closing the window.)
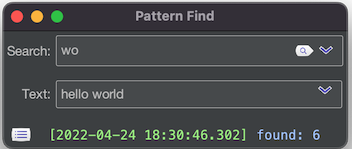
Action property combination
As a special rule, you can combine an action-button and a text-field in object pane:
- An object-pane class has the
String <propName>property, - and the class also has the
<propName>Action()action method.
Then, the generated text-field for the property will contain the action button for the method.
import java.util.regex.*;
class PatternFind {
    String text;
    String search;
    void searchAction() {
        var m = Pattern.compile(search).matcher(text);
        if (m.find()) {
            System.out.printf("found: %d%n", m.start());
        } else {
            System.out.println("not found");
        }
    }
}
org.autogui.swing.AutoGuiShell.showLive(new PatternFind())
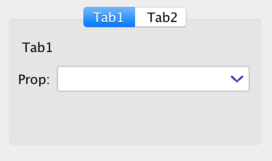
Object tabbed-pane
A user-defined object which has only properties of sub user-defined objects without other value properties will be bound to a tabbed-pane. Components of each tab in the tabbed-pane become the pane created from the sub objects.
  class Hello {
      Tab1 tab1 = new Tab1();
      Tab2 tab2 = new Tab2();
  }
  class Tab1 {
      String prop;
  }
  class Tab2 {
      int prop;
  }
  org.autogui.swing.AutoGuiShell.showLive(new Hello())
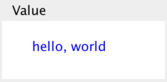
Embedded component
A property of
javax.swing.JComponent
or its sub-type will be bound to a pane for embedding the property value as sub-component.
  import java.awt.*;
  import javax.swing.*;
  class Hello {
      private JComponent value;
      JComponent getValue() {
          if (value == null) {
              value = new JPanel() {
                  { setPreferredSize(new Dimension(300, 300)); }
                  protected void paintComponent(Graphics g) {
                      g.setColor(Color.white);
                      g.fillRect(0, 0, getWidth(), getHeight());
                      g.setColor(Color.blue);
                      g.drawString("hello, world", 30, 30);
                  }
              };
          }
          return value;
      }
  }
  org.autogui.swing.AutoGuiShell.showLive(new Hello());
To create a user-defined UI component, you will need to follow the rule of Swing components that the code for the component must be executed within the event-dispatching thread. And initialization of a field will be executed under a non event-dispatching thread such as the main-thread.
Thus, the user code of the property for an embedded component should be defined as a getter method that caches the returned component as a field. For a property of the embedded component, the library executes the method within the event-dispatching thread. A returned embedded component will be added as a sub-component of the owner object-pane.
Embedding component to your Swing applications
To embed object GUI created by the library into your Swing applications, you can use
org.autogui.swing.GuiSwingRootPane.createForObject(o).
Please see
src/test/java/org/autogui/demo/ObjectEmbeddedDemo.java.
To run the example:
mvn test-compile exec:java -Dexec.classpathScope=test -Dexec.mainClass=org.autogui.demo.ObjectEmbeddedDemo
Collection table
A property for
java.util.Collection<E>,
its sub-type or an array type E[] will be bound to a table pane.
The column of the table will be created from the type-argument E.
  import java.util.*;
  class Hello {
      List<String> prop = new ArrayList<>();

      void add() {
          prop.add("hello " + prop.size());
          prop = new ArrayList<>(prop);
      }
  }
  org.autogui.swing.AutoGuiShell.showLive(new Hello())
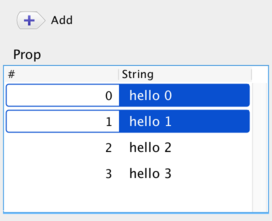
In order to update display of the table from an action, it needs to replace instance of the list. prop = new ArrayList<>(prop); is the easiest way for that.
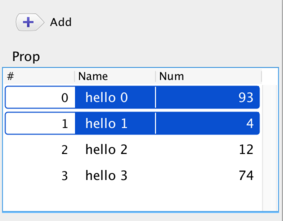
Object rows
If the type-argumentE of Collection<E> is a user-defined object class, then columns of the table are created from properties of the class.
   import java.util.*;
   class Hello {
       List<Item> prop = new ArrayList<>();
       void add() {
           prop.add(new Item("hello " + prop.size(), (int) (Math.random() * 100)));
           prop = new ArrayList<>(prop);
       }
   }
   class Item {
       String name;
       int num;
       Item(String n, int i) { this.name = n; this.num = i; }
   }
   org.autogui.swing.AutoGuiShell.showLive(new Hello())
Actions for selected rows of Collection table
If a method of the property-owner takes the element-type E of
java.util.List<E>,
then the table has a button of a tool-bar for the method. The button executes the method with a list containing objects of selected rows in the table.
If the element object in the collection has an action-method, then the table has a button of a tool-bar for the method. The button executes the method for each objects of selected rows in the table.
   import java.util.*;
   class Hello {
       List<Item> prop = new ArrayList<>();
       void add() {
           prop.add(new Item("hello " + prop.size(), (int) (Math.random() * 100)));
           prop = new ArrayList<>(prop);
       }
       void remove(List<Item> selectedItems) {
           prop.removeAll(selectedItems);
           prop = new ArrayList<>(prop);
       }
   }
   class Item {
       String name;
       int num;
       Item(String n, int i) { this.name = n; this.num = i; }
       void update() { ++num; }
   }
   org.autogui.swing.AutoGuiShell.showLive(new Hello())

Managing table item selection
The created table for lists has ability to control selection of item cells.
There are two types of bindings:
- Special methods for actions of changing selected items in the table by returning a list of the items : specified by
@GuiListSelectionUpdater - Special methods for callbacks of user item selection from the table UI: specified by
@GuiListSelectionCallback
import java.util.*;
import org.autogui.*;
class Hello {
    List<Item> prop = new ArrayList<>();
    void add() {
        prop.add(new Item("Hello " + prop.size()));
        prop = new ArrayList<>(prop);
    }
    @GuiListSelectionUpdater
    List<Item> selectTop() {
        return Arrays.asList(prop.get(0));
    }
    @GuiListSelectionCallback
    void selected(List<Item> items) {
        System.out.println("selected: " + items);
    }
}
class Item {
    String name;
    Item(String n) { this.name = n; }
    public String toString() { return "Item(" + this.name + ")"; }
}
org.autogui.swing.AutoGuiShell.showLive(new Hello())
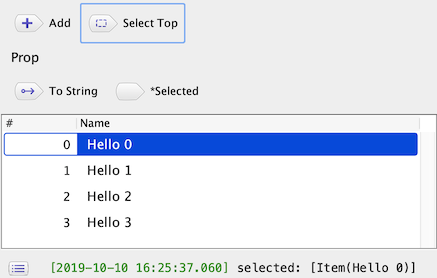
In the above example, List<Item> selectTop() has @GuiListSelectionUpdater. The method becomes the action button “Select Top” and it causes changing the selection in the table of prop as selecting the top item in the list, which is returned by the method.
And, void selected(List<Item> items) has @GuiListSelectionCallback and takes a list of items. The method also becomes the action button “*Selected”, but the action of the button is automatically executed by a selection change of the table of prop.
The target table of those special methods are specified by the item type, i.e. the type argument E of List<E> . If two or more tables has the same item type of those methods, then all of the tables are affected by the methods.
As another special feature, both annotation types have the boolean argument index. The default value of the flag is false, and if it is specified as true, then the return or argument type of the target methods becomes List<Integer> and it means the index numbers of rows instead of the item type E. Moreover, List<int[]> means list of {row,column}.
Changing cell sizes
The created table has ability to change column and row sizes via the pop-up menu of the table-header.
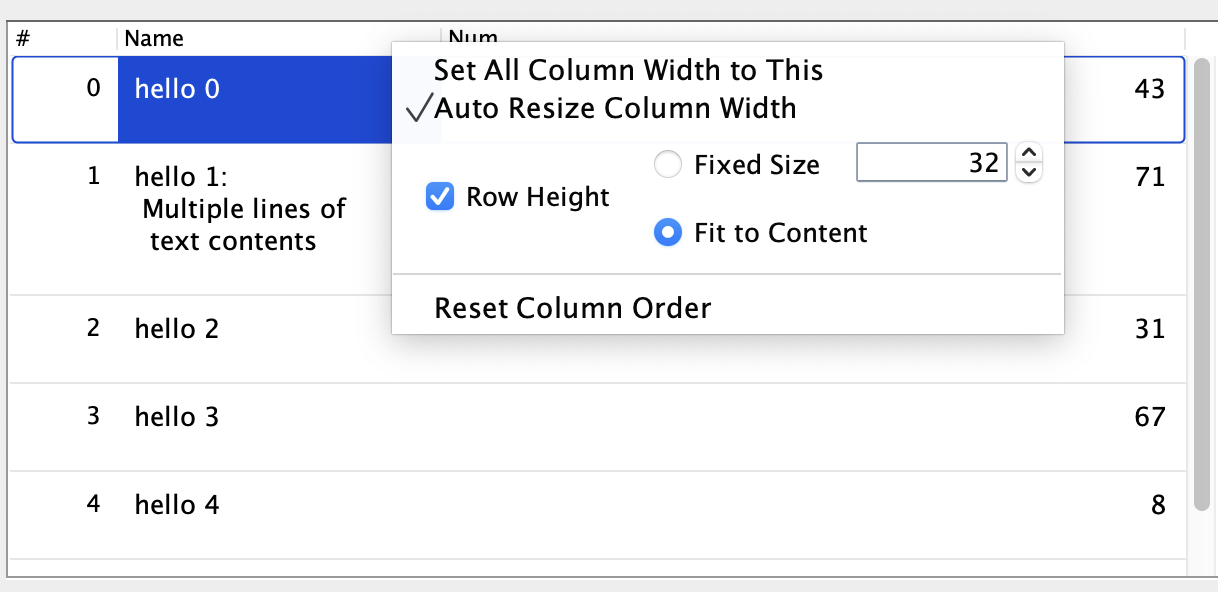
- Set All Column Width to This : makes all column widths the target column.
- Auto Resize Column Width : automatically sets the all column widths
- Row Height : switches customization of row heights.
- Fixed Size : sets all row heights to the specified size.
- Fit to Content : sets each row height from the content size.
Naming rule and @GuiIncluded(name=…)
Display-names of properties, actions and type-names are generated from their identifiers with following camelCase.
  class Hello {
      String helloWorld; //=> "Hello World"
      String helloWORLD; //=> "Hello WORLD"
  }
The name can be customized by the annotation @GuiIncluded(name=...).
  class Hello {
      @GuiIncluded(name="class") String klass;
  }
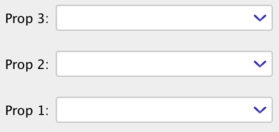
Layout order by @GuiIncluded(index=…)
Order of layout of components can be controlled by the annotation
@GuiIncluded(index=...).
The default order is determined by names of the properties.
  import org.autogui.GuiIncluded;
  class Hello {
      @GuiIncluded(index=3) String prop1;
      @GuiIncluded(index=2) String prop2;

      private String prop3;
      @GuiIncluded(index=1) String getProp3() { return prop3; }
      void setProp3(String p) { prop3 = p; }
  }
  org.autogui.swing.AutoGuiShell.showLive(new Hello())
For a pair of getter and setter, one of annotations attached to the members is adopted.
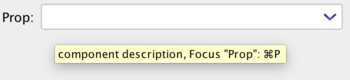
Component description by @GuiIncluded(description=…)
To display a tool-tip message for a member, you can use
@GuiIncluded(description=...).
   import org.autogui.GuiIncluded;
   class Hello {
       @GuiIncluded(description="component description") String prop;
   }
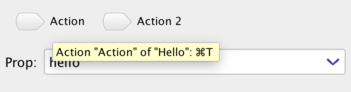
Key binding by @GuiIncluded(keyStroke=…)
The library automatically sets shortcut keys for members based on their names.
@GuiIncluded(keyStroke=...) can control binding keys.
keyStroke="none": avoid bindingkeyStroke="<control>... <key>"control ::= shift | altkey ::= A | B | C |... | Z | 0 | 1 ... | 9
- Reserved keys: Those keys are combined with Command (macOS) or Control.
Q: Quit,W: Window closeshift R: RefreshA: Select all,shift A: Un-selectZ: Undo,shift Z: RedoO: Open,S: SaveX: Cut,C: Copy,V: Pastealt O: JSON open,alt S: JSON save,alt X: JSON cut,alt C: JSON copy,alt V: JSON paste,: Settings
   import org.autogui.GuiIncluded;
   class Hello {
       @GuiIncluded(keyStroke="L") String prop;
       @GuiIncluded(keyStroke="T") void action() {
           System.out.println("action " + prop);
       }

       //automatically bound by the method name "action2", like Shift+Cmd+A
       void action2() {
           System.out.println("action2");
       }
   }
   org.autogui.swing.AutoGuiShell.showLive(new Hello())
For actions, shortcut keys cause execution of the target action. For properties, shortcut keys cause UI to focus on the target component. Also, Control + Enter will display the context menu for the focusing component.
Active updating of UI elements
As default, a GUI component generated by the library automatically updates its display, i.e. it notices changes that requires re-displaying by accessing their properties after some actions happened.
The feature of
@GuiNotifierSetter
enables you to explicitly update a specified GUI element by calling given a
Runnable
object. The annotation can be attached to a setter method taking a Runnable argument. In your code, you can call the run() method of the given Runnable object in order to cause re-displaying of the target GUI element on demand. The target GUI element can be specified by the signature set<YourPropertyName>Notifier(Runnable r) or by using the annotation parameter @GuiNotifierSetter(target="yourPropertyName").
import java.util.concurrent.*;
import org.autogui.*;
import java.time.*;

class Hello implements AutoCloseable {
   private ScheduledExecutorService service;
   private ScheduledFuture<?> task;

   String prop;

   private Runnable updater;
   @GuiNotifierSetter
   void setPropUpdater(Runnable r) { updater = r; }

   Hello() {
      service = Executors.newScheduledThreadPool(1);
      task = service.scheduleWithFixedDelay(this::update, 0, 3, TimeUnit.SECONDS);
   }
   private void update() {
      prop = Instant.now().toString();
      if (updater != null) {
          updater.run();
      }
   }
   public void close() {
       task.cancel(true);
       service.shutdownNow();
   }
}
org.autogui.swing.AutoGuiShell.showLive(new Hello())
The above example will show a text field that periodically updates its text as the current time every 3 seconds.
The updating is done by the update() method; it rewrites prop with the time string (
Instant.now().toString()
) and notifies the change of the field to the text field by explicitly calling Runnable#run() to the updater set by setPropUpdater(Runnable). The setter name specifies the prop field as the target of the updater by following the naming rule set<YourPropertyName>Updater.
In the constructor of the class, the update() method will be scheduled by
ScheduledExecutorService#scheduleWithFixedDelay(this::update, ...)
method as a ScheduledFuture task.
Preferences management
The created window has ability to save and reuse a set of property-values of its binding sub-components.
This feature relies on
java.util.prefs.
   class Hello {
       String prop;
   }
   org.autogui.swing.AutoGuiShell.showLive(new Hello())
It automatically saves edited property-values through the binding components as preferences. You can see and edit the current saved preferences from the Preferences… menu-item in the Object menu of the created window.
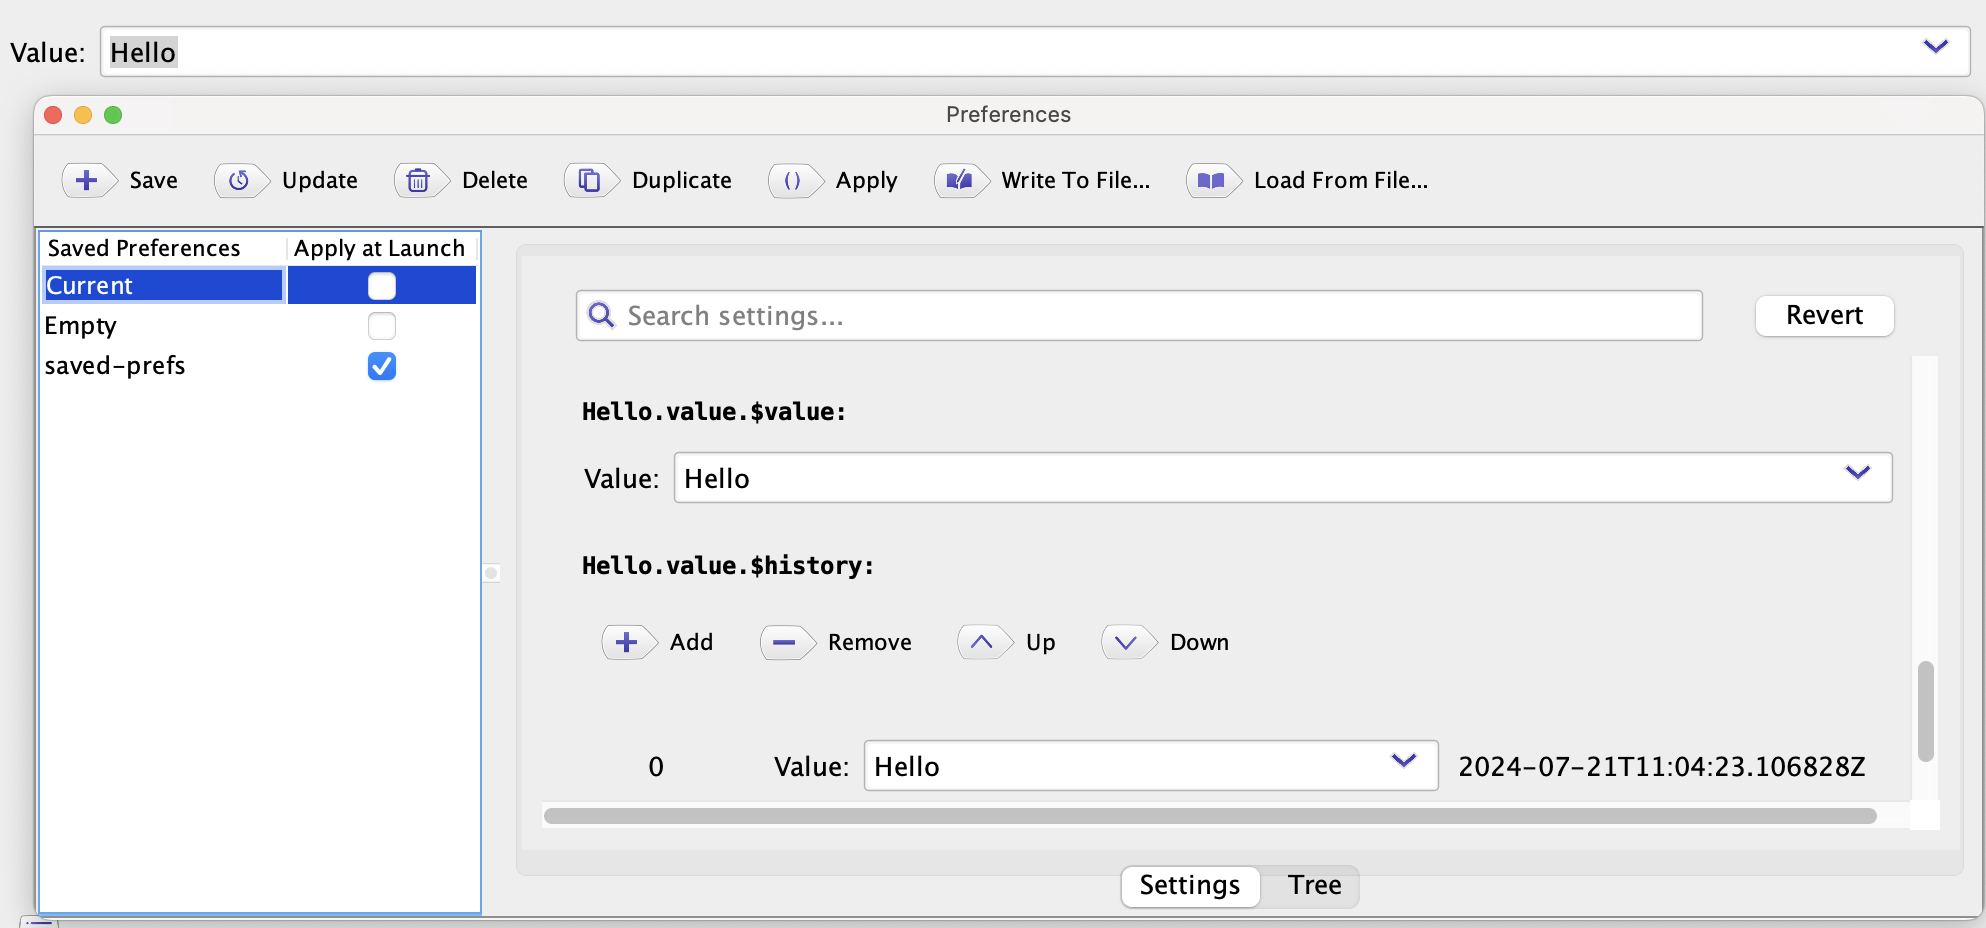
The menu shows a window for preferences like the above screenshot, and it has a list of saved preferences.
The list contains following preferences:
- Current : the default (unnamed) preferences. The values of the preferences will be actively updated by UI operations.
- Empty : a pseudo preferences for resetting.
- Saved preferences : recorded preferences. It can be added by the Save action in the tool-bar; the action collect current values and settings of UI components and saves as a new recorded preferences. You can change the name of the item by double-clicking in the list.
The list can also the check-box column “Apply at Launch”. You can select a saved preferences for restoring values at starting-up.
In the tool-bar of the window, the Delete and Duplicate actions can delete or duplicate the selected saved preferences. The Update action overwrites the selected preferences by the values from the current UI components. The Apply action immediately restore the selected preferences to the current UI components. The Write To File… and Load From File… actions can save/load preferences as a JSON file.
From 1.7-, you can see and directly edit the selected preferences values from the right-pane in the window.
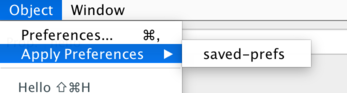
Also, the saved preferences will be listed as items in the Apply Preferences menu of the Object menu, and can be applied by selecting the item.
Additionally, GuiPreferencesLoader enables you to set properties saved by the feature to an object as non-GUI code.
   var h = new Hello();
   org.autogui.base.mapping.GuiPreferencesLoader.get()
     .withTypeBuilderRelaxed()
     .withPrefsGetterByNameEquals("saved-prefs")
     .apply(h);

   h.prop //=> "Hello"
Custom preferences for embedded components
Your custom embedded components can easily interact with preferences mechanism of the library.
To support the feature, a return-type of the property method must be your custom component-type that implements the GuiPreferences.PreferencesJsonSupport interface.
The interface has 2 methods for generating and setting preferences-data as JSON objects.
Note that the feature works when the static return-type of the property method satisfies the interface. So you will need to specify the your type into the return type.
import org.autogui.base.mapping.GuiPreferences;
import javax.swing.*;
import java.util.*;

class Hello { //object-pane type
    MyPane pane;
    MyPane getPane() { //embedded component returning a custom type
        if (pane == null) pane = new MyPane();
        return pane;
    }
}

class MyPane extends JPanel
     implements GuiPreferences.PreferencesJsonSupport {
    JTextField data = new JTextField(20);
    MyPane() {
        add(data);
    }
    public Map<String,Object> getPrefsJson() { //data for writing to prefs-store
        System.err.println("save " + data.getText());
        return Map.of("myItem", data.getText());
    }
    @SuppressWarnings("unchecked")
    public void setPrefsJson(Object v) { //set data from prefs-store
        if (v instanceof Map<?,?>) {
            data.setText(((Map<String,String>) v).getOrDefault("myItem", ""));
        }
    }
}
org.autogui.swing.AutoGuiShell.showLive(new Hello())
The returned object of getPrefsJson() must be one of simple JSON supported types (Map, List, String, Number, Boolean) and sufficiently small for storing preferences-store.
Providing default setting values in code
Since the version 1.8, the library introduces the annotation @GuiInits in order to enable providing the default values of several preferences of components in code.
import org.autogui.GuiIncluded;
import org.autogui.GuiInits;
import org.autogui.base.annotation.*;
import org.autogui.swing.AutoGuiShell;
import javax.swing.text.*;

@GuiInits(window = @GuiInitWindow(width = 400, height = 300))
public class MyEditor {
    DefaultStyledDocument doc = new DefaultStyledDocument();

    @GuiInits(action = @GuiInitAction(confirm = true))
    public void clear() throws Exception {
        doc.replace(0, doc.getLength(), "", null);
    }
}
org.autogui.swing.AutoGuiShell.showLive(new MyEditor())
The above code will show a window with a text pane and the “Clear” aciton button, and the initial size of the window will become 300 x 400. Also, when the user clicks the “Clear” action, it will display a confirmation dialog before running the action.
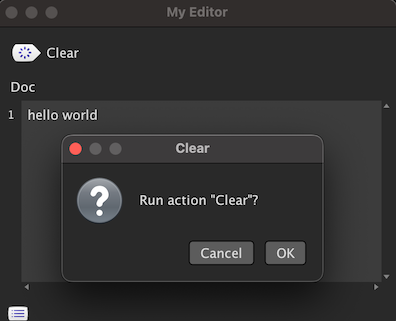
Those effects are thanks to the default settings by both @GuiInits(window = ...) attached to the class and @GuiInits(action = ...) attached to the method.
The annotation @GuiInits has comprehensive definitions for all available items in this feature, as properties (like window = ... action = ...).
The actional setting items are defined in the annotations set for the properties of @GuiInits, like @GuiInitWindow and @GuiInitAction in the package org.autogui.base.annotation.
| Property | Value type | Target | Setting items |
|---|---|---|---|
tabbedPane |
@GuiInitTabbedPane |
parent type of object tabbed pane | Suppressing tabbing |
splitPane |
@GuiInitSplitPane |
parent object pane type of splitted-components | Specifying vertical orientaiton |
window |
@GuiInitWindow |
root object pane type | Size |
table |
@GuiInitTable |
Collection table property | Specifying row height, and dynamic column size |
tableColumn |
@GuiInitTableColumn |
table column property | Column width and sorting order |
tableColumnString |
@GuiInitTableColumnString |
table column string property | Swinging enter-key input/inserting a new line |
numberSpinner |
@GuiInitNumberSpinner |
number property | Format, maximum, minimum and stepping size |
action |
@GuiInitAction |
action method | Displaying a confirmation dialog |
Logging
The created window has a status-bar and a list of displaying logging entries. An logging entry can be one of the following types:
- String message
- Progress
- Exception
Logging string messages
The created window will replace
System.err and
System.out with redirecting its outputs to a status-view and a list-window on the created window.
Note: the replacing feature can be controlled by system-properties read in GuiSwingLogManager#setupConsoleWithDefaultFlags(). You can dismiss the replacement by -Dautogui.log.replaceErr=false -Dautogui.log.replaceOut=false.
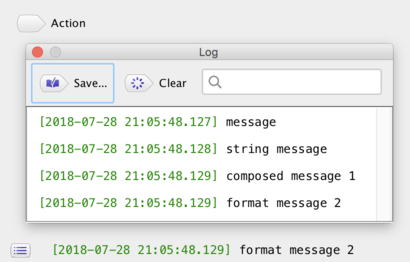
Also, the user-code can directly show messages via
GuiLogManager.
     import org.autogui.base.log.*;
     class Hello {
         void action() {
             System.err.println("message");
             GuiLogManager.get().logString("string message");
             GuiLogManager.get().log("composed message ", 1);
             GuiLogManager.get().logFormat("format message %d", 2);
         }
     }
     org.autogui.swing.AutoGuiShell.showLive(new Hello());
Logging progress
GuiLogEntryProgress
created by
GuiLogManager
can show and control a progress-bar. The factory method
logProgress(n)
creates an instance of the entry with the max count n.
It can update the current count by
addValue(i) or
addValueP(p)
with taking 0…1.0.
The progress-bar can also show a message by
setMessage(s).
     import org.autogui.base.log.*;
     class Hello {
         void action()  {
             new Thread(this::m).start();
         }
         private void m() {
             try (GuiLogEntryProgress p = GuiLogManager.get().logProgress(100)) {
                 for (int i = 0; i < 100; ++i) {
                     p.setMessage("next " + i).addValue(1);
                     Thread.sleep(1000);
                 }
             } catch (InterruptedException ie) {
                 GuiLogManager.get().logError(ie);
             }
         }
     }
     org.autogui.swing.AutoGuiShell.showLive(new Hello());
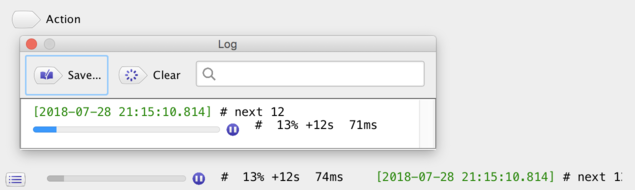
The button attached to the right side of the progress-bar causes an interruption of
Thread
of calling logProgress().
The interruption causes an
InterruptedException
while thread-blocking caused by some APIs such as
Thread.sleep(n).
For running code without blocking, you will need to insert
Thread.interrupted()
in order to explicitly check the interruption.
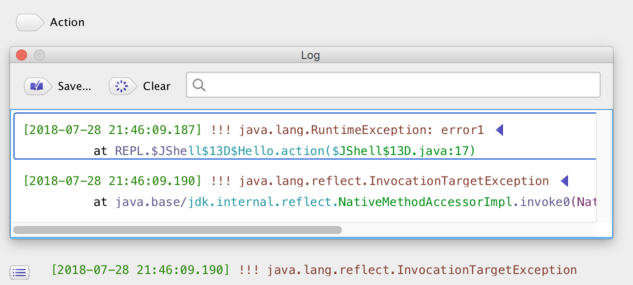
Logging exceptions
The created window sets an uncaught exception-handler for displaying the exception in the logging list. Also
GuiLogManager.get().logError(e)
can explicitly display the given exception. The displayed exception becomes an item in the logging list with expandable stack-traces.
   import org.autogui.base.log.*;
   class Hello {
       void action() {
           GuiLogManager.get().logError(new RuntimeException("error1"));
           throw new RuntimeException("error2");
       }
   }
   org.autogui.swing.AutoGuiShell.showLive(new Hello());
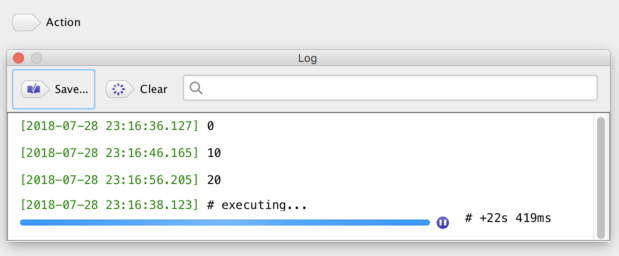
Long running action and progress-bars
A long running action will be an independent task with displaying an indeterminate progress-bar. The stop button can cause an interruption resulting in
InterruptedException or
Thread.interrupted().
  class Hello {
      void action() throws Exception {
          for (int i = 0; i < 100; ++i) {
              if (i % 10 == 0) System.err.println(i);
              Thread.sleep(1000);
          }
          System.err.println("finish");
      }
  }
  org.autogui.swing.AutoGuiShell.showLive(new Hello())
Setting appearance
The current Swing GUI (in Java23) does not have automatic support of recent OS’s dark-mode switching.
However, there are some custom look-and-feel (LAF) libraries for supporting dark-mode such as darklaf and flatlaf.
The launching-process of the library sets LAF automatically.
You can control the specification of LAF by the property autogui.laf which can be set by -Dautogui.laf=... of the JVM option.
The property can take the following values.
Note UIManagerUtil.selectLookAndFeelFromSpecialName(String) is the corresponding code.
- No value, the empty string
"", ordefault- loading flatlaf, explained later
- In MacOS, and if the current appearance is not dark, then it applies
system(the system default LAF: AquaLookAndFeel) - Otherwise, it applies
nimbus-flat
default-no-darklaf: Same asdefault, except no-loading flatlafmetal: appliesjavax.swing.plaf.metal.MetalLookAndFeelnimbus: appliesjavax.swing.plaf.nimbus.NimbusLookAndFeelnimbus-flat: appliesNimbusLookAndFeelCustomFlat, the original LAF in the librarynimbus-flat-light: applies the light-theme ofNimbusLookAndFeelCustomFlatnimbus-flat-dark: applies the dark-theme ofNimbusLookAndFeelCustomFlatsystem: applies OS specific LAFdarklaf: tries loading flatlafnone: nothing to do for LAF
NimbusLookAndFeelCustomFlat
The LAF org.autogui.swing.util.NimbusLookAndFeelCustomFlat specified by nimbus-flat is the original implementation in the library (1.7-), which extends the existing NimbusLookAndFeel in JDK,
and it can judges the current theme at launching time and applies the light or dark theme.
Though the way of the judging the theme differs by OS,
it is achieved by invoking external commands.
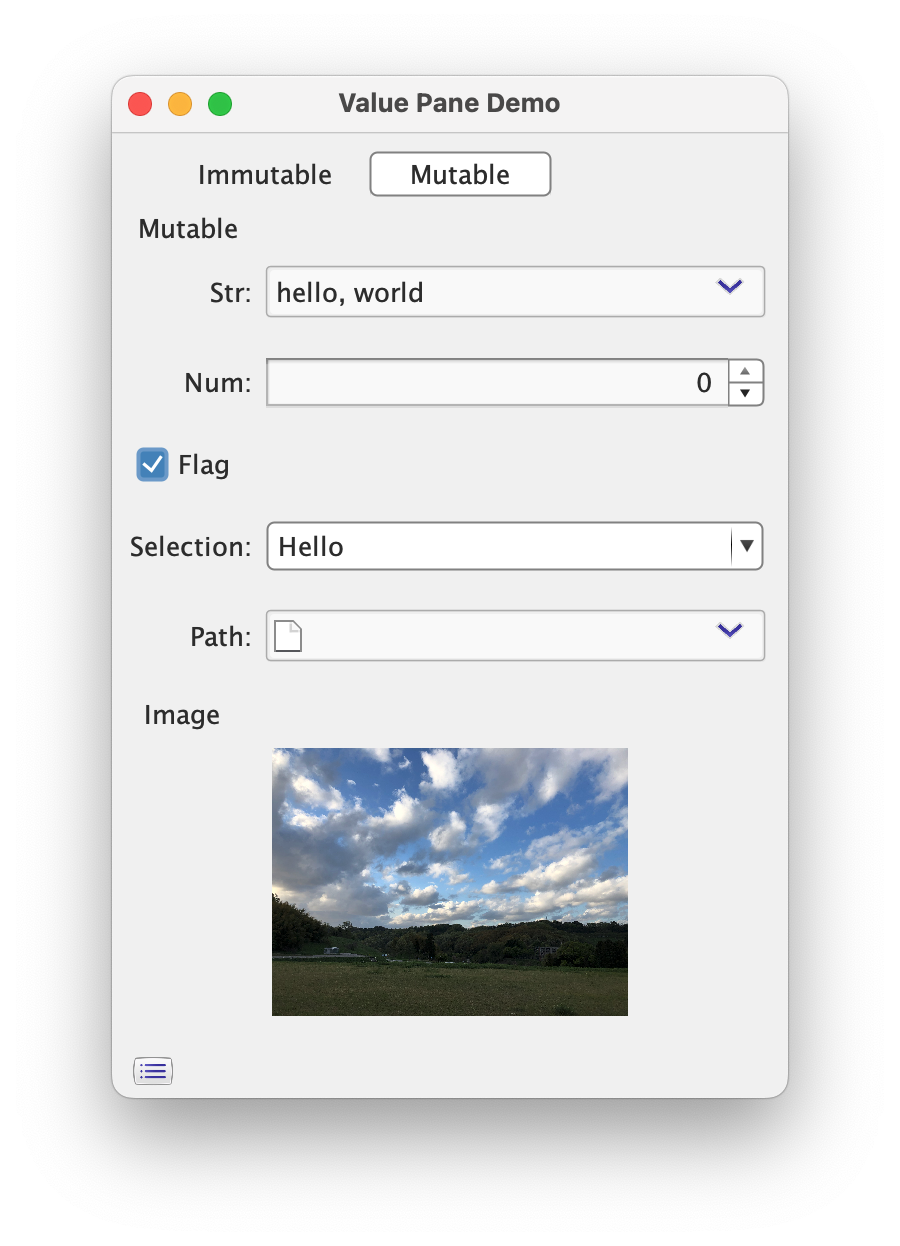
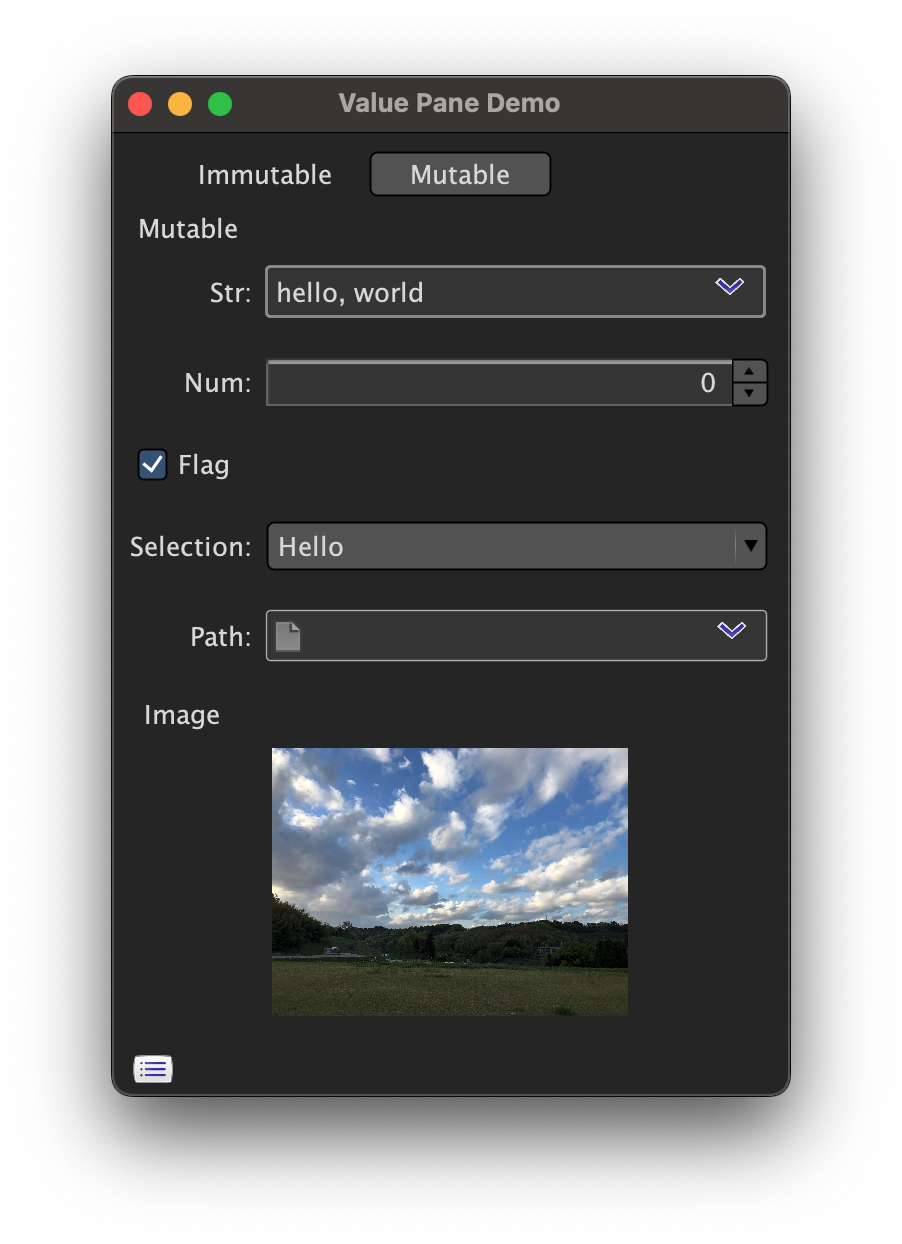
Also, those styles can be specified by nimbus-flat-light and nimbus-flat-dark.
nimbus-flat-light |
nimbus-flat-dark |
|---|---|
 |
 |
In MacOS, you can apply the dark-mode aware windows by appending the JVM option -J-Dapple.awt.application.appearance=system.
In HiDPI GNOME environment (including the default Ubuntu), you might get suitable display with the environment variable GDK_SCALE=2.
Loading Flatlaf
The default specification of the library implicitly detects existence of flatlaf (confirmed by com.formdev:flatlaf:3.6) and applying its LAF with following the OS’s current theme. The detection is simply done by accessing to the reflection Class object through Class.forName.
Controlling appearance by code
By calling a method defined in the class AutoGuiShell, you can control the LAF settings.
For example, before running the object of the class Hello, the following code can control the LAF settings.
  AutoGuiShell.get()
    .withLookAndFeelDefaultWithoutProp() //diable settings by the property, and using nimbus-flat or flatlaf
    .showWindow(new Hello());

  AutoGuiShell.get()
    .withLookAndFeelDefaultNoFlatlafWithoutProp() //disable settings by the property, and using nimbus-flat
    .showWindow(new Hello());

  AutoGuiShell.get()
    .withLookAndFeelSpecial("metal") //same as set "metal" to the property "autogui.laf"
    .showWindow(new Hello());